
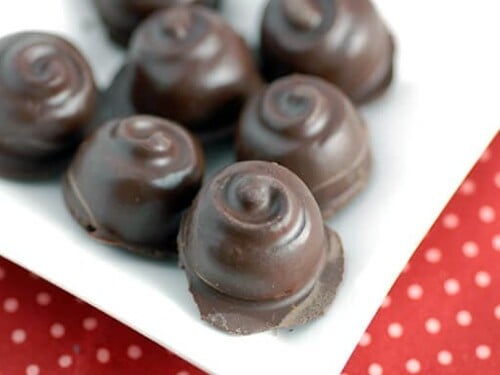
This easy 2-ingredient Chocolate Raspberry Bonbons recipe is the perfect Valentine’s day treat! Made with dark chocolate and fruit sweetened raspberry jam it’s such a breeze to throw together that my children love to make it. Of course they do! What’s better than the combination of raspberries and chocolate?!
Valentine’s Day can be a super fun and crafty holiday. Unfortunately, it can also be a wasteful time when loads of processed candy and useless merchandise is sold. That’s why I’ve taught my boys over the years to have fun creating homemade gifts for friends and family. We especially enjoy making our own healthy candy, and these Chocolate Raspberry Bonbons fit that bill perfectly!
Usually I start out whipping up this treat, and the boys take it over. That’s how the making of healthy candy recipes generally takes place in our house. The boys are little rascals in the kitchen and I love it!
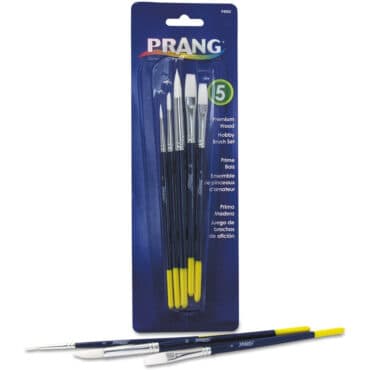
I think we all enjoy making this healthy candy because it’s a bit of an artistic project. Somehow, using a small paint brush to spread the melted chocolate into the molds reminds us of painting in kindergarten, where there were no mistakes.
Chocolate Raspberry Bonbons
Ingredients
- ¾ cup chocolate chips
- ¼ cup raspberry jam
Instructions
- Melt chocolate in a small pan over very low heat
- Using a small paint brush, coat the bottom and sides of a candy mold
- Place mold in freezer 10 minutes to allow chocolate to harden
- Remove mold from freezer
- Spoon a scant teaspoon of raspberry jam into each chocolate lined cup
- Paint chocolate over raspberry jam to cover
- Place in freezer 10 minutes to harden
- Remove from freezer, turn mold upside down and pop candies out of mold
- Serve
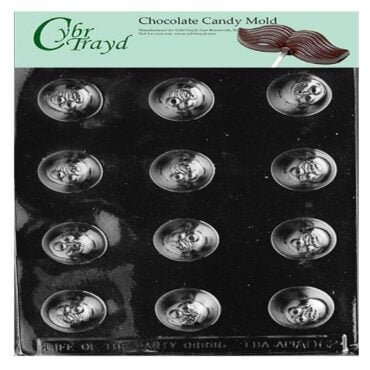
These bonbons call for the same mold![]() that my healthy homemade Chocolate Covered Cherries recipe uses. If you are looking for a candy recipe that does not use a mold, check out my Nut Butter Balls.
that my healthy homemade Chocolate Covered Cherries recipe uses. If you are looking for a candy recipe that does not use a mold, check out my Nut Butter Balls.
Here are some of my other easy low-carb candy recipes!

Kay says
Also, I know that some almond flours won’t with some recipes. That’s why I ask what flour to use. It would be nice if you listed all the flour brands that would work. Why do some brands work and some don’t? Is it the grind, and if so, could I grind it more myself to make it work?
Elana says
Kay, here is a list for you:
https://elanaspantry.com/why-almond-flour/
Happy baking!
Elana
Kay says
which almond flour brands do you recommend? I have Natures eats, will that work?
Elana says
Kay, I haven’t tried that brand. Here are the brands that work in my recipes:
https://elanaspantry.com/why-almond-flour/
Have a great day!
Elana